Egg Dyeing Tips Just in Time for Easter
If you haven’t already started the Easter egg hunts, then you still have some time to create fun and beautiful designs. These egg dyeing tips might be some you’ve used for years, while others could give you a brand new perspective. Have plenty of towels and cleaning supplies on hand? Good. Let’s get started.
Chalkboard Eggs
This one’s easy and gives the kids a chance to change the design a few times. All you need is some chalkboard paint and colored chalk. Start first with a hard-boiled egg, because none of these designs are pretty when the yolk oozes through cracks in the shell. Then cover the egg with a layer of chalkboard paint, which you can find at pretty much any craft or home improvement store.
When the paint is dry, you’re ready to design. Pass out the colored chalk and let the kids go to work. Their designs will be erasable, so you can create something new over and over again.
Pretty Ribbon
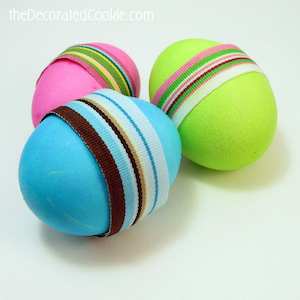
Find ribbon in colors you love, whether lace, satin, or grosgrain. Once you’ve dyed the eggs to your desired color, then choose a ribbon that complements the hues. Lay the ribbon flat, roll the egg in it, and then trim the excess once the ribbon encircles the width of the egg. Be sure to cut the ribbon as straight as possible, and then use a little dab of glue to secure it.

The end result is so pretty that you’ll have a hard time throwing the eggs away when all the Easter egg hunts are over. You might save the ribbon for future crafts, though!
Jackson Pollock Eggs
For this fun look, you can start with plain white eggs or some dyed to your favorite colors. Then, choose some complementary colors of acrylic paint and squeeze some out onto a paper plate. Dip an old toothbrush into the paint, hold a few inches over the eggs, and run your thumb over the bristles. The ensuing spray will speckle the eggs with vibrant color.
You can just speckle one color or use them all. Get wildly creative with drips, splashes, and color combinations. You can make those eggs a true masterpiece.
Silk-Dyed Eggs
Gather up any old silk ties and scarves around the house for this next project. These really do have to be 100% silk, so check the tags or risk disappointment. You also want to make sure you choose some darker colors for brighter results, though pastels can be pretty, too.
Cut the ties open at the back and remove the lining. Then strip out the seams until you have one flat piece of silk. The printed side should make contact with the egg when you wrap it. Create a little baggie with the egg inside and tie off the top to keep the silk as close to the egg as possible. Then wrap the egg and silk inside a piece of white pillowcase and tie that end off. A twist tie is the perfect solution.
Put your silk-wrapped eggs into a pot of water and a quarter cup of vinegar. Boil for about 20 minutes, and then let cool. When you unwrap the silk, you will be absolutely stunned at the beauty.
Keep in mind that you probably shouldn’t eat the eggs that have been dyed with silk. Actually, you may want to avoid the chalkboard eggs, too. Otherwise, enjoy the beauty and deliciousness of your creations this Easter.
If you have plenty of land, Easter egg hunts are a blast. With acres and acres to search, you could keep the kids busy all day. If you’re still searching for the perfect plot of rural land, give us a call. With low down payments and monthly payments, buying land has never been easier. You’ll be ready for next year’s hunts!


